Deck Repair is a fairly cost-effective project, depending on what needs to be done. Damage caused by a downed limb will obviously cost more to repair than if surface rot is the only problem.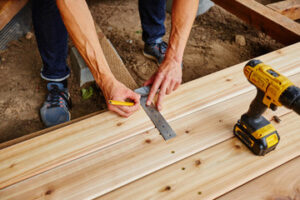
When replacing a damaged board, use a hammer and pry bar to remove nails or screws and to avoid harming adjacent boards. Make sure the new replacement will span two joist spaces, and mark cutting lines with a speed square and pencil.
Structural damage to a deck can be incredibly dangerous for your friends and family who use it and people passing by. If the structure collapses, it could crush them. There are a number of causes for structural damage, including wood rot and rusted nails and screws. Some of these issues are not easily repaired and will require a full rebuild.
One of the most common structural issues with a deck is dry rot, which occurs when water seeps into the boards and eats away the wood cellulose. It can be difficult to tell if a board has rot, but you can try poking a screwdriver into the area and seeing if it goes in easily. If the tip sinks in, the board has rotted and needs to be replaced.
Another common structural issue is the failure of the posts and beams that support the deck. This can happen for a number of reasons, from weather damage to incorrect construction and installation.
Other issues include the failure of the footings, which are concrete pads that sit underneath the deck to help with support and stability. Many people build their decks on top of these pads, but when they deteriorate, the deck can collapse. Using the proper type of foundation is vital to the integrity of your deck, so it’s important that you speak with an expert before starting a project.
Other structural issues that can occur are termite infestation and damage, rusted fasteners, and deck framing problems. If you notice any of these issues, it’s likely time for a rebuild.
Water Damage
Few things strike fear in the hearts of homeowners like water damage. It can cause mold, destroy building materials, and ultimately weaken the structural integrity of your home. Decks are no exception and can be a breeding ground for water damage that may seep into your house. This can occur at the point where your deck meets your house or in areas around it.
The best way to spot potential problems is with regular inspections. Taking the time to do a visual and hands-on inspection of your deck can help you catch issues before they become serious and costly. If your wood deck boards feel spongy or soft, that is a sign that the wood has been damaged by moisture and may be rotted.
If you walk on a section of your deck and notice that it feels soft or hollow, you should contact a local contractor right away, as this is likely an indicator that the structure has been compromised by rot. You should also inspect the footings of your deck to ensure that they are intact and not showing signs of cracking or shifting.
Another common area where you may find rot is around the nails and screws that hold the decking boards in place. The Family Handyman explains that water can sit around these fasteners and begin to penetrate the joists below and then the decking boards themselves. In severe cases, you may need to replace the entire deck and also the exterior sheathing, insulation, and wall studs of your home.
Deck railings can also be affected by rot. This is often caused by constant exposure to sun and rain and the aging of the wood. It is important to have a professional inspect your railings to ensure that they are safe for children and adults who may lean on them.
Decks can also be damaged by termites, carpenter ants, and woodpeckers. These pests are able to bore holes into the wood and will create a hollow area in the middle of the board. In addition to causing unsightly damage, they can weaken the boards and make them more prone to breaking. In the case of termites, you will need to have a local pest control company come in and treat the area before you can move forward with any repairs.
Staining or sealing
Staining or sealing a deck is a great way to make it look new and protect the wood from the elements. It’s also a good opportunity to take stock of the wood and repair any loose boards, drive down nails or screws that are sticking out, and replace any that are rotting or warped. It’s best to perform this task while the wood is dry and the surface is still pliable enough to work on. Before staining, don a dust mask to avoid inhaling the fine sawdust from sanding the wood. Start by inspecting the deck for splinters and removing any that you find. Then, use a pole sander and 50-grit paper to rough sand the whole deck, including any handrails or balusters you have. Then, wipe away any sanding dust and let the deck dry completely.
Stains are available in many colors and are designed to penetrate the wood to color it, preserving the natural texture of the grain while adding a luster and protecting against sun damage. They can be transparent, allowing the wood to show through for a more natural look; semi-transparent to change color but allow the grain to show; or solid, covering the whole board with one solid color. Many stain products also offer a combination stain-sealant and will adjust the color, but not as dramatically as paint.
Sealants, on the other hand, soak into the wood and help prevent moisture from penetrating the boards and causing rot. They can be clear or tinted, and some even have a pigment to help block UV rays that cause the wood to dry out, crack, and gray. Sealants typically need to be reapplied every 3–6 months, depending on the climate in your area.
Before applying the stain, sweep the deck and wipe down any other surfaces you plan to stain, like railings or balusters, using a damp cloth. Then apply the stain according to the manufacturer’s instructions. Spraying is usually the quickest way to get an even coat of stain on the deck, but a brush or roller can be used as well.
Replacement
If the damage is extensive, a repair may be less costly than a complete replacement. However, it’s important to check for structural damage before making a decision. For example, if the deck’s ledger board—the long piece of pressure-treated lumber that attaches to the house—is rotted, it could threaten the stability of the entire deck.
If a large portion of the deck has rotted, it’s best to replace it entirely. This is a good time to evaluate the deck as a whole and make any necessary improvements, such as staining or sealing.
Begin by removing the damaged boards, then inspecting and repairing the joists underneath. Look for any rot that has spread from one area to other boards and for any other areas of damage or wear. If you see any, hire a professional to perform repairs and/or replace the affected boards.
Once the joists have been repaired, you can replace the deck boards. When doing this, use the old boards as templates to cut new ones. Make sure the new boards span two joist spaces or more to ensure that the deck is stable. Before cutting, put on eye protection and use a speed square to mark straight cutting lines on the boards or a jigsaw. If using a jigsaw, use a coarse blade to avoid cutting notches into the adjacent boards.
Then nail or screw the new boards to the joists. If you’re installing the boards yourself, drill pilot holes to prevent splitting, especially at the board ends. For added strength and beauty, cleats (also known as “skirting”) can be installed between the joists. These can be made from pieces of 2×4 lumber treated with a preservative, or you can buy them in 12-inch-long sections at most hardware stores.
Before putting the new board into place, examine it to determine whether it has cupping. A cupped board is more prone to rot than a flat board. If it does, position the new board so its end faces up, then fasten it to the joist with 16-diameter nails or 3 1/2-inch deck screws.